

Andy Davis
June 20, 2023
Swagger Authorize Button
Recently, a work colleague asked me to show him how to get that “Authorize” button on the Swagger API dashboard.

Clicking on the button activates a modal pop-up where you can enter your JWT access token to authorise your user in the Swagger API.
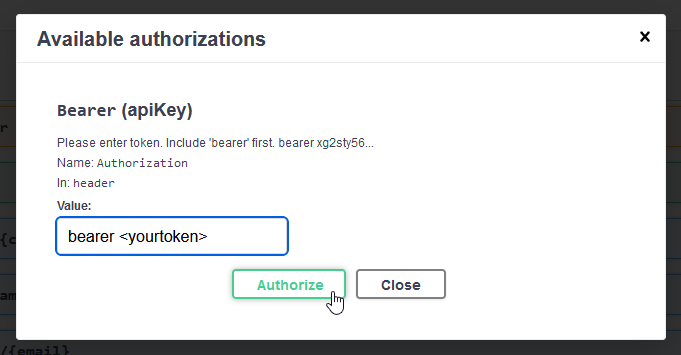
This allows you to access protected API routes in the Swagger API.
The Code
Luckily, it's not that complicated. I am using a .NET 6 example so everything in in the Program.cs file. if this was a Core version this would all be in the Startup.cs file.
services.AddSwaggerGen(c =>                                                                                     // Swagger Config
{
    c.SwaggerDoc("v1", new OpenApiInfo { Title = "API_Project", Version = "v1" });
    c.AddSecurityDefinition("oauth2", new OpenApiSecurityScheme                                                 // So swagger can add bearer tokens to requests
    {
        Description = "Please add the authorization token. Example: \'bearer 14a156fg...\'",                    // Adds "Authorize" button description
        In = ParameterLocation.Header,
        Name = "Authorization",
        Type = SecuritySchemeType.ApiKey
    });
    c.OperationFilter<SecurityRequirementsOperationFilter>();                                                   // Install Swashbuckle.AspNetCore.Filters
});
Remember to also have your JWT Authentication options set up.
 services.AddAuthentication(JwtBearerDefaults.AuthenticationScheme)
    .AddJwtBearer(OptionsBuilderConfigurationExtensions =>
    {
        OptionsBuilderConfigurationExtensions.TokenValidationParameters = new TokenValidationParameters
        {
            ValidateIssuerSigningKey = true,
            IssuerSigningKey = new SymmetricSecurityKey(System.Text.Encoding.ASCII.GetBytes(Configuration.GetSection("<Your config file section>").Value)),
            ValidateIssuer = false,
            ValidateAudience = false
        };
    });
Finally, configure swagger to load on startup.
app.UseSwagger();
app.UseSwaggerUI(c => {
    c.SwaggerEndpoint("/swagger/v1/swagger.json", "Your_Project");
    c.RoutePrefix = "";                                                 // Set Swagger as homepage
});